
Headless WooCommerce moves your storefront off WordPress’s PHP theme layer and renders it through a modern framework like Next.js instead. Done for the right store, it takes page loads well under a second while leaving the WooCommerce backend – products, orders, integrations – exactly as it is. This guide explains how that works, what it delivers, and how to tell whether your store is one of the few that should go headless at all.
Bottom line: headless is the fastest option, but a $70K+ rebuild only pays off above roughly $3M in annual revenue. Below that, most stores reach the same half-second page loads (460-560ms) through WooCommerce optimization, at about a third of the cost and without rebuilding anything.
A note before we start: this guide gets into architecture and performance. If that is your world, the detail is here. If it is not, the short version is simple – headless makes a large store very fast, most stores do not need it, and optimization gets the rest of us most of the way there. Skip to the FAQ for what that means for your store.
Why Go Headless with WooCommerce?
When it comes to online shopping, speed moves money. Deloitte’s Milliseconds Make Millions study found that even a 0.1-second improvement in site speed lifted retail conversions by close to 10%. Google’s Core Web Vitals tie that loading experience directly to rankings and to how shoppers behave.
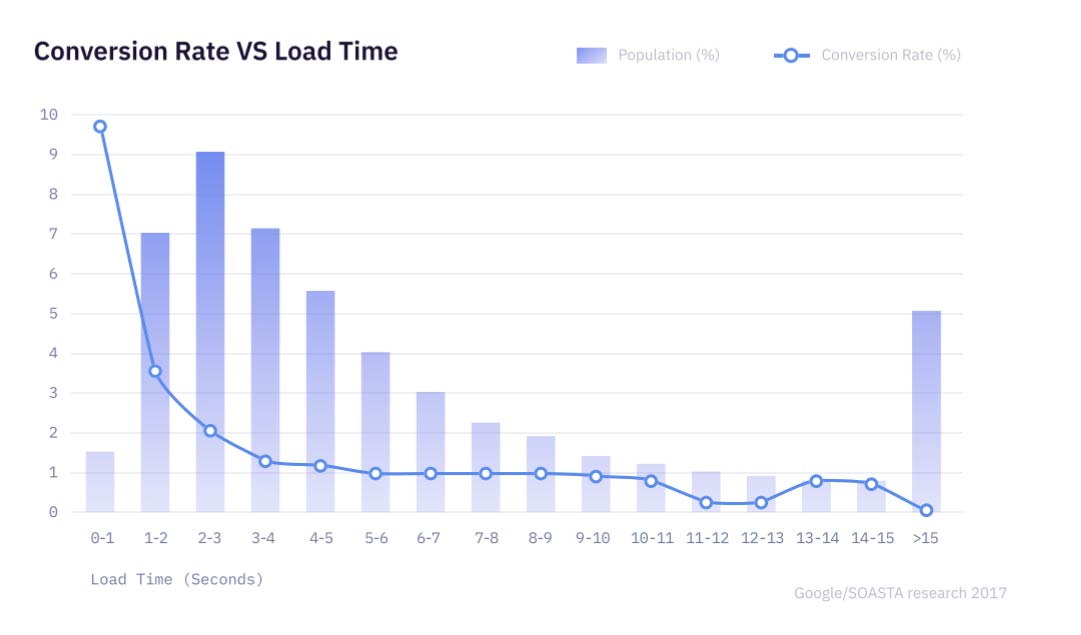
Walmart’s well-known research showed conversion rates falling sharply as load times climbed from 1 second to 4. The takeaway is not a magic number, it is a direction: faster pages convert better, and mobile – where most traffic now sits – is where the gap hurts most.
A traditional WooCommerce setup can struggle to hit those speeds under load, especially on mobile. Going headless decouples the frontend from the backend, which brings a few clear advantages:
- Performance: Near-instant page loads, which support higher conversion rates and average order value.
- Flexibility: Choose the best technology for each layer rather than working within a theme’s limits.
- Scale: Add features and absorb traffic spikes without the frontend and backend competing for resources.
A modern frontend framework like Next.js supplies server-side rendering, incremental static regeneration, and performance defaults a PHP theme cannot match. The result, built properly, is better-structured pages, faster loads, and stronger SEO. The deeper technical reasoning is in headless WooCommerce with Next.js.

Headless is the fastest option. It is not the right one for most stores.
We went headless with stores like Gourmet Basket in 2022 because it was the most reliable way to get WooCommerce fast under serious load. Since then, better hosting, full-site editing, and the optimization work we do have changed the math. Here is the honest comparison:
When headless isn’t the answer, the when not to go headless guide covers the decision. The WooCommerce Revenue Audit tells you which side of the line your store is on.
Case Study: Gourmet Basket’s Transformation
Here is what headless looks like when it is the right call. Gourmet Basket, a long-time client, hit serious performance problems during peak sales periods. Over eight years their site had grown complex, and at high volume – well above $3M a year – the checkout was timing out under load.
In 2022, we moved them to a headless build. Within days of going live, Gourmet Basket saw a 30% lift in average order value. They recouped the investment within 60 days. They are exactly the kind of store headless is built for, and most stores are not here – which is the point.
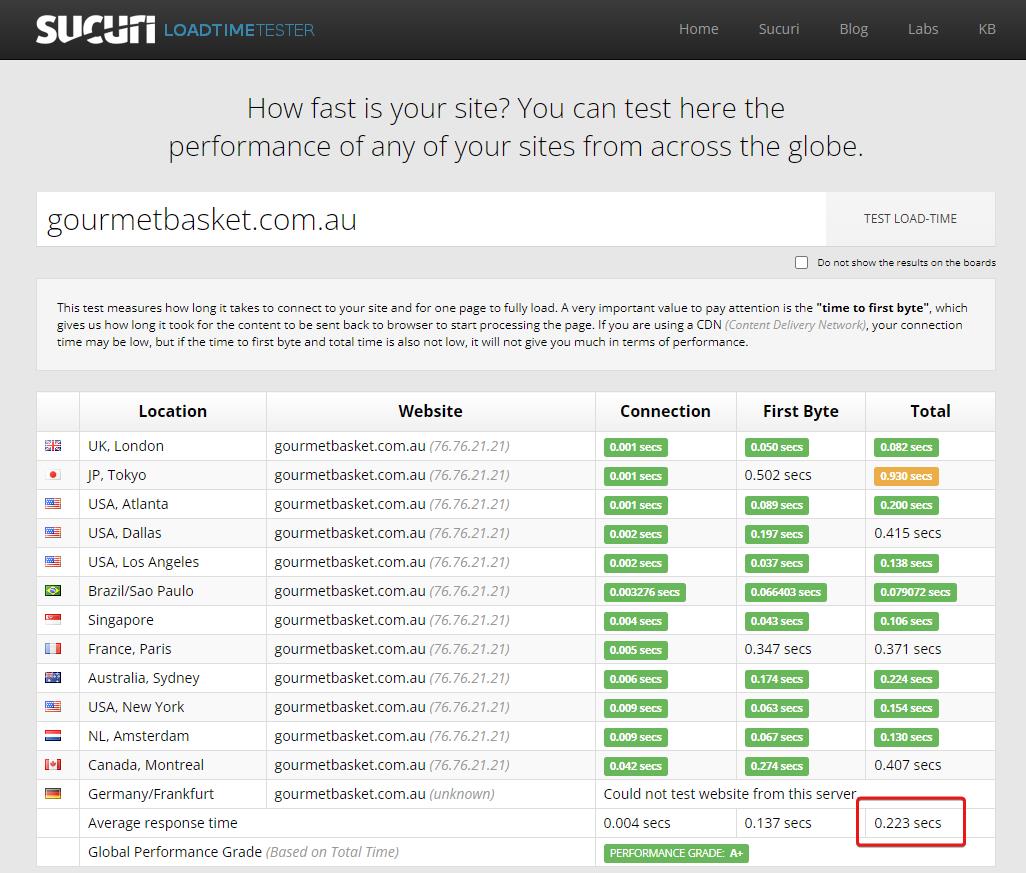
The page-speed result was the headline: an initial page load of 0.223 seconds, with a Largest Contentful Paint of 596ms – faster than most major ecommerce stores and well under Google’s 1-second target. The full breakdown is in the fastest WooCommerce page speed in the world, and the video walkthrough is in the Gourmet Basket case study.
How Headless WooCommerce Works
A headless build splits a WooCommerce store into three parts that each do one job well:
- The frontend – the pages shoppers see – is built on a framework like Next.js and rendered as static or server-rendered HTML, then served from edge locations close to the shopper. That is where the speed comes from.
- A search and data layer (for example, Typesense) handles product search, filtering, and sorting in milliseconds, and takes that query load off WordPress so the backend stays responsive even on a large catalog.
- The WooCommerce backend stays exactly as it is. Products, orders, pricing, and integrations are managed the same way, and checkout continues to run on WooCommerce so payments, shipping, and tax logic keep working without a rebuild.
The reason the frontend is fast is that the heavy work happens ahead of time. Instead of WordPress building each page on every request – running plugins, theme code, and database queries – the pages are pre-rendered and pushed to a global edge network, so the shopper receives a finished page almost immediately. The trade-off is real, though: every one of those moving parts has to be built and maintained, which is why headless only pays off above a certain revenue level.
When Headless Is Worth It
Headless earns its keep when the conversion lift from that speed pays back a $70K+ rebuild inside a year. In practice that means a high-volume store – roughly $3M+ in annual revenue – often with checkout or performance buckling under peak load, the way Gourmet Basket’s was. If that is your store, headless is a strong move and Next.js is a solid foundation for it.
For most stores, though, the math points the other way. WooCommerce optimization – efficient rendering, optimized images, caching, a lean frontend – reaches the same half-second page loads (460-560ms) without a rebuild, for about a third of the cost. The results are real: Austin Natural Mattress grew net sales by 582% and average order value by 88% on standard WooCommerce, and Henry Holsters took its mobile PageSpeed from 56 to 95 – both without going headless. The honest decision framework is in when not to go headless with WooCommerce.
Frequently Asked Questions
What is headless WooCommerce, in plain terms?
It is a WooCommerce store where the storefront shoppers see is rendered by a separate, faster application (often built on Next.js) instead of a WordPress theme. The WooCommerce backend – products, orders, integrations – stays in place. Only the frontend layer changes, which is what makes the store fast.
Should my store go headless?
Probably not, and that is the honest answer for most stores. A headless rebuild runs $70K+ over 4-6 months, so the conversion lift has to pay that back – which usually means a store doing $3M+ a year with performance buckling under load. Below that, WooCommerce optimization reaches the same half-second page loads (460-560ms) for about a third of the cost. When not to go headless walks through the decision.
Will going headless change how I run my store?
No. You keep the WooCommerce admin. Products, orders, pricing, and content are managed the same way, and integrations keep working. Checkout stays on WooCommerce. What changes is the frontend layer the shopper sees.
How fast can headless WooCommerce go?
For a high-volume store built properly, well under a second. Gourmet Basket reached 0.223-second page loads with a 596ms Largest Contentful Paint. That is a headless outcome for a large store; most stores that optimize their existing WooCommerce setup land in the 460-560ms range, which is fast enough that speed stops costing them sales.
What does the WooCommerce Revenue Audit include?
A paid, full diagnosis of your store across performance, UX, analytics, and build, with the specific revenue leaks quantified and a prioritized plan. For headless questions, it tells you straight whether a rebuild or optimization fits your store and revenue level. Start your audit here.